Thursday, December 23, 2021

Mutta Pathiri/ Pola/ Muttayappam / Ottata using non-stick pan


മുട്ടപ്പത്തിരിയും ചൂടുള്ള കോഴികറിയും ... കേൾക്കാൻ തന്നെ നല്ല സുഖമില്ലേ ... മൺചട്ടിയിൽ ചെറുചൂടിൽ ചുട്ടെടുതില്ലെങ്കിലും , എന്റെ Non-stick pan മുട്ടപ്പത്തിരി വീട്ടുകാർക്ക് പെരുത്ത് ഇഷ്‌ടായി. The heat plays a big role when you make Malabar special Mutta Pathiri. You have to pour batter when the pan is hot , then lower the flame and wait till you get bubbles on top and then close the pan. I learned that trick after ruining 2 or 3 mutta pathiri this time 😬.   

Ingredients 

Rice flour: 3/4 Cup

Hot water : 1 Cup

All purpose flour : 1 Cup 

Coconut milk : 1 cup ++


Egg : 2 lightly beaten


Baking powder : 1/2 tsp 


Salt : 1/2 tsp ++

Directions 

🌼 Add boiling water to  rice flour and mix well.Keep aside and  allow it to cool.

🌼  In a mixer grinder, add 1 cup coconut milk , all purpose flour , eggs , baking soda , salt and the rice flour mix. Grind it into a smooth batter. Add more coconut milk if needed. Batter should not be thin( Iddli batter consistency). Keep the batter aside for 10 minutes to form bubbles on top.


🌼 Heat a non stick pan In medium flame and add 1 scoop of the batter. Turn the heat to low, and wait until you see bubbles on top. Now you can close the pan with a lid. (First mutta pathiri will not form much bubbles)


🌼 You can serve it with coconut milk and sugar or with any chicken/ mutton/ beef gravy. I served mutta pathiwith warm Kerala chicken stew this time.

Enjoy,

Lena 


Sunday, September 26, 2021

Homemade fig Jam


This post is so special to me. This jam is made from fresh figs from my neighbors backyard. I plucked each fig, cleaned, chopped , cooked and canned in 2 hours. This is the best jam I ever made too. Canning is very interesting if you do it right. The key to safe canning is two factors - acid and heat. Botulism simply can’t live in an acidic environment. The acid in jam comes from the fruit itself as well as added acid like lemon juice (some fruits are acidic enough on their own, but some need a bit of extra help in the form of lemon juice or other added acid).

Ingredients

30-40 Fresh Figs
1 Cup Sugar
1/2 Cup Honey
2Tbsp Lemon Juice (Juice from one lemon)


Directions


Step 1 : In a Dutch oven / wide nonstick pan add the cleaned and chopped figs(Do not add water) . Cook in low - medium flame for 15-20 minutes.

Step 2 : Add Sugar and honey and continue cooking. Mash them to break down into tiny chunks.

Step 3 : Cook till they are really thick. Add lemon juice , cook for a minute and turn off the flame.


Enjoy,
Lena

Wednesday, September 22, 2021

The easiest One Bowl Chocolate cake with the best Chocolate Buttercream ever !!!!


Happy Fall Everyone!!!

I love all seasons, but the first day of fall is something to be remembered. It's the promise to a change, the promise of cooler, beautiful weather, colorful leaves, and lots of fun fall activities to cross off our bucket list. After a long gap, I started taking my guitar lessons again. We had an amazing Summer harvest for last couple of months, and now as Fall teaches us, I should let go off the old ones to make space for the new fall garden. Sometimes I'm too tired after work, long drive, busy traffic, but it all fades in background when I come home. I will just sit on sofa for a while, and Rashmin will make an expresso or Rithika will make an orange juice for me. Thats enough for my kick start. When you count your blessings, you will understand you're actually doing more than great. We have a camping trip this weekend, Rithika has fall break next week, I will start my fall garden in 3 weeks, and we want to do a movie night in our backyard too. See, I have my never ending list for this fall :)


Best chocolate cake ever


The best chocolate cake with Chocolate buttercream

Prep time : 20 mins, Cooking time : 30 mins, Yield : 2 - 9 inch round cake layers
Recipe courtesy : Hershey's

Ingredients

2 cups white sugar

1 ¾ cups all-purpose flour

¾ cup unsweetened cocoa powder

1 ½ teaspoons baking powder

1 ½ teaspoons baking soda

1 teaspoon salt

2 eggs

1 cup milk

½ cup vegetable oil

2 teaspoons vanilla extract

1 cup boiling water

Directions

Step 1 : Preheat oven to 350 degrees F (175 degrees C). Grease and flour two nine inch round pans.

Step 2 : In a large bowl, stir together the sugar, flour, cocoa, baking powder, baking soda and salt. Add the eggs, milk, oil and vanilla, mix for 2 minutes on medium speed of mixer. Stir in the boiling water last. Batter will be thin. Pour evenly into the prepared pans.

Step 3 : Bake 30 to 35 minutes in the preheated oven, until the cake tests done with a toothpick. Cool in the pans for 10 minutes, then remove to a wire rack to cool completely.

Recipe for thick and creamy Chocolate buttercream frosting
Preperation time : 10 Minutes, Recipe Courtesy : sallysbakingaddiction

1 cup (230g) unsalted butter, room temperature
3 and 1/2 cups (420g) confectioners’ sugar
1/2 cup (41g) unsweetened natural or dutch-process cocoa powder
3 Tablespoons (45ml) heavy cream or milk
1/8 teaspoon salt
2 teaspoons pure vanilla extract

With a handheld or stand mixer fitted with a paddle or whisk attachment, beat the butter on medium speed until creamy – about 2 minutes. Add confectioners’ sugar, cocoa powder, heavy cream, salt, and vanilla extract. Beat on low speed for 30 seconds, then increase to high speed and beat for 1 full minute. Add 1/4 cup more confectioners’ sugar or cocoa powder if frosting is too thin or another Tablespoon of cream if frosting is too thick. Taste. Beat in another pinch of salt if desired.
Use immediately or cover tightly and store for up to 1 week in the refrigerator or up to 3 months in the freezer. After freezing, thaw in the refrigerator then beat the frosting on medium speed for a few seconds so it’s creamy again. After thawing or refrigerating, beating in a splash of heavy cream or milk will help thin the frosting out again, if needed.

Enjoy,
Lena

Wednesday, May 26, 2021

Purple Dream


I’m going to call this cake “Purple Dream”. I created this 3rd Birthday cake for my friend’s daughter. This cake has a special place in my heart because I baked it with the the birthday girl at her home (Yes, A three year old little chef as my assistant )❤️❤️. We created a mess in her kitchen but it was a memorable experience. She cracked the eggs , beat the butter , baked the cake , made buttercream... I can’t wait for next year to create her 4th birthday cake. Love you Ishya and I wish you a very happy birthday ❤️❤️❤️ 


This is a Vanilla  Butter cream (yes, my go to 1-2-3-4 cake), with Vanilla Buttercream, decorated with rice paper and edible gold leaf.


Enjoy,

Lena

Tuesday, May 25, 2021

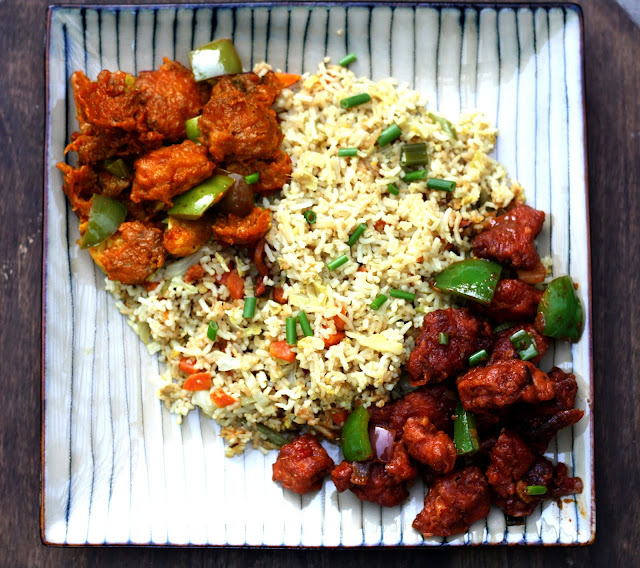
The Best Fried rice Ever!!!


 Serves :   5 Adults

Ingredients : 


Basmati Rice : 1 1/2 cup, cooked and cooled (See Notes*)
Vegetable Oil/ Saffola / Canola oil : 3 tbsp +1tsp
Eggs : 4, Optional
Beans : 4, Finely Chopped
Carrots : 2, Finely Chopped
Celery : 1 rib, finely chopped
White onion : 1/2 Cup, Finely chopped
Cabbage : 1/2 Cup, Finely Chopped
Spring Onions : 2, Finely Chopped
Capsicum : 1, Sliced
Green Chilies : 2, Finely chopped
Ginger : 1 inch piece, Finely Chopped
Garlic : 9 cloves, Finely Chopped
Soya Sauce : 1 1/2 tsp
Salt &pepper to taste
Sugar : a pinch to sprinkle in the end
Curry powder : 1/4 tsp to sprinkle in the end (My secret ingredient to make perfect Fried rice each time)

Method :

1. Beat egg with 1tbsp water, enough salt and pepper. Heat 1tsp oil in a kadai/ wok/ non-stick pan and  add the eggs and cook till they are soft and fluffy. Transfer to a plate. Now add remaining  3tbsp oil and add ginger, garlic and green Chillies. Now add  all vegetables in following order onion, celery, beans, carrots, cabbage, capsicum, and half of spring onion. Saute on medium to high flame.

2. After 2-3 minutes add enough salt and pepper powder. Now add cooked rice 1cup at a time and combine well.  Once you finish combining the entire rice with stir fried veggies,  fry in high flame for 4-5 minutes. Add soya sauce and mix well. Sprinkle crushed pepper, curry powder and sugar. Mix together and close the pan with a tight lid. Turn off the gas and serve immediately. 

3. Garnish with chopped spring onions and serve hot with gobi manchurian / Restaurent style chili chicken / pepper mushroom fryChilli Mushroom / Pepper Chicken.

Method for cooking rice / noodles for Chinese Cuisine

Wash and soak rice for 20 - 30minutes. Now drain  the rice using a colander. Take a large kadhai / saucepan/ cooker  and fill the vessel with 3/4th of water (around  8-10 cups) and bring to boil. Now add enough salt and then add drained rice. Add 1/2tsp of refined oil and wait till the rice is 90%cooked. Take care not to overcook the rice. Each grain of rice should be separate. When it's done strain using a colander and Spread on a wide plate. This is a crucial step in making fried rice. If you are not spreading the rice to cool, the bottom layer of rice will get overcooked  and you will get mushy fried-rice. Allow the rice to cool for several hours.

Note : Make sure you are making fried rice with cooled rice. you can make rice before 4hrs  or previous day you make the fried rice. 


Similar Posts


Enjoy,
Lena

Monday, March 8, 2021

Classic crepes / How to make French crepes at home

Is there anything better than a plate of warm crepes on a Sunday morning?  Crepes are thin and delicate French-style pancakes made without any leavener.  Even-though the ingredients are almost similar, crepes are very different from pancakes. These are light and delicate with crispy buttery edges.  


 Basic crepes / Classic crepes recipe
Cooking Time : 10 min , Serves : 4 , Calories : 481 cal

All purpose flour : 2cups
Sugar : 2 tbsp
Salt : 1/8tsp
Eggs : 2
Milk :1Cup
Water : 1/4Cup
Vanila Extract : 1tsp
Unsalted Butter : 3tbsp (plus more to grease the pan)

How to Make Crepes

1. Melt the butter : Melt 3tbsp butter in the microwave or on the stove. Allow it to cool for 3 minutes before adding to the batter. (Otherwise you could scramble the eggs in the batter.)

2. Combine all ingredients in a blender: Add the cooled melted butter and all the remaining ingredients into a blender. Blend for 1 minute and your crepe batter is ready (You can definitely make the batter using a wire whisk, but it makes the batter lumpy. Adding into the blender makes the batter smooth and thin.)

3. Chill the batter : This is a crucial step while making crepes. Chill the crepe batter for at least 30-60 minutes before cooking it. This allows the bubbles to subside so the crepes will be less likely to tear during cooking. The batter will keep for up to 48 hours in refrigerator. ( I usually rest them for 30minutes and use that time to clean up the blender and get my skillet ready.)

4. Heat an 8inch non-stick pan : Butter the heated skillet and add little less than 1/4 cup batter in the middle of the pan and swirl the batter. Cook for 30 seconds and flip. Cook for another 10 seconds and transfer to a large plate. Always try to use less batter so you can stretch the batter into a larger and thinner crepe. If you add more batter, your crepes will be pretty thick, still delicious, but very different from the traditional crepes. Repeat step 4 to finish making crepes.

5. Serve with your favorite fillings : I love serving them warm with cold whipped cream / fresh fruit compote/ nutella / apple pie filling / fresh berries.

Similar Recipes :

Enjoy,
Lena

Wednesday, February 24, 2021

Jack Daniel’s cake for my Husband ❤️


 This is a classic 1- 2 -3 -4 cake filled with lemon curd and layered with Litchi butter cream frosting. I used a bread loaf pan to bake the cake. The bottle cap is made with rice krispie treats. Each layer is soaked with litchi sugar syrup. I used my classic butter cream recipe and added litchi juice and chopped canned litchi to make the litchi butter cream. Covered the entire cake with fondant and added edible paper decorations for the Jack Daniel's bottle details. Hand painted the cake in brown and black to get the color of liquor.

Recipe for Litchi Buttercream

Unsalted Butter : 1Cup / 2sticks, at room tempterature(Not melted!!!)
Powdered Sugar : 4Cups
1/2 cup chopped litchi from 18oz canned litchi tin
Milk / Heavy cream : 1tbsp
3tbsp litchi juice 
A pinch of Salt

Method: 

1. Beat butter for a few minutes with a mixer with the paddle attachment on medium speed. 

2. Add powdered sugar and turn your mixer on the lowest speed until the sugar has been incorporated with the butter. 

3. Increase mixer speed to medium and add litchi juice, chopped litchies, salt, and 1 tablespoons of milk/cream and beat for 3 minutes. 

4. Divide frosting into 2 bowls.

Recipe for Litchi Sugar syrup 

2cups Litchi juice
1 1/2 Cups granulate sugar

Add both ingredients into a sauce pan and bring to a boil until the  sugar dissolves. (2-3 minutes). Allow to cool and its ready to use. You can store this litchi simple syrup in the refrigerator for up to 2 weeks.

I don't use squeezable plastic bottle to store and pour the syrup, instead I  spoon it over the cake or even brush it over the cake with a pastry brush. I use about 1-4 tablespoons per layer, depending on the size of the layer.

Enjoy,
Lena

Tuesday, January 19, 2021

Flamingo cake for Rithika's 11th Birthday

 Stand tall my darling!!!!


Every year I make themed birthday cake for my daughter's birthday. Over the years I have taught myself, through trial and error, to make some pretty neat  cakes. I loved baking and decorating each of them. And I think this is the most beautiful cake I have ever made.

This is a classic 1- 2 -3 -4 cake filled with lemon curd and layered with orange butter cream frosting. Due to pandemic, there was no big birthday party this year. Just a birthday cake and a special lunch with family.  I made  3 six inch cakes 2 days before birthday party. Crumb coated and finished the cake with fondant. Topper is made with fondant and gum paste. And the highlight of the cake - Feathers, they are with wafer paper. I hand-painted 40 feathers and air dried for 10hours. Adding real gold leaf to the cake was another surprise for my daughter.  


Enjoy,

Lena


Wednesday, January 6, 2021

VARUTHARACHA KAAYA , CHEMMEEN CURRY / RAW BANANA AND SHRIMP WITH ROASTED COCONUT GRAVY


Ingredients :


Shrimp : 15, medium pieces, cleaned and deveined
Raw banana/ pachakkaaya : 1, slice lengthwise half and chop into triangles
Onion : 1, chopped
Ginger : 1/2 inch piece, chopped
Green Chili : 2, chopped
Garlic : 2 cloves, finely chopped
Curry leaves : springs
Gambooge/ kudambuli : 3 pieces, soak in warm water for 30 minutes
Salt 

For the roasted gravy :

Grated coconut : 1 Cup
Turmeric Powder :1/2 tsp
Chilly Powder : 1/2 tbsp
Fennel seeds / perumjeerakam1/4tsp(optional)
Coriander powder : 1/2 tbsp
Coconut Oil : 1tsp + 1tbsp

Method :

1. Make the roasted coconut masala  :  Heat a skillet on Low - medium flame and add shredded coconut. Stir fry till the coconut turns into a golden brown color.   Now add fennel seeds, chili powder and coriander powder and fry for 2 more minutes. Turn off the flame and add turmeric powder. Let it cool. ( To speed up this roasting process, you can add 2 tsp of coconut oil and fry coconut in medium flame to get the dark golden brown color easily). When the coconut cools down, add few tablespoons of water and grind into a smooth paste.

2. Onion masala Using a mixer crush together onion, ginger, green chillies, garlic and curry leaves.Heat 1tsp coconut oil and add this crushed onion masala paste.  After 4-5 mins, when the masala start changing color, add the ground coconut paste, raw banana slices, salt and water (around 1.5 cups - 2 cups). 

3. Make the gravy : Add drained gambooge pieces to the gravy and allow to boil. When the gravy starts to thicken,  add the  fish pieces. Swirl the pan to make sure that the fish pieces are coated well with the masala. Cover and cook. Switch off the gas and add 1 tbsp coconut oil and curry leaves. Let it rest for a while for the flavor to settle in. Color of this curry will deepen as it rests.

4. Serve hot with rice / appam / kappa :)

Enjoy, 
Lena